Introduction
With Khords, a huge selection of tonal material is just a few clicks away. It’s a huge selection of harmonic inspiration that brings sampled personality and classic character to your productions. With 550 chord presets at your fingertips, it’s never been easier to get mix-ready tones straight into your tracks.
Loading the Plugin in your DAW
You’ll find Khords in the Loopmasters folder in your DAW’s plugin browser. Start or restart your DAW once installation is successful, and Rescan your plugins list in your DAW’s preferences if necessary. Khords is listed in the Loopmasters folder.


Authorisation
Khords works in demo mode for 14 days before authorisation is necessary. You can find your license code in your Account page at pluginboutique.com
To enter your authorisation code, click on either the 'Bass Master' or 'Powered by Loopmasters' logo to view the About page, where you can copy and paste your code. You will also be prompted to enter your license when loading and opening the plugin in demo mode.

Copy the whole code as one, including the text ---START--- and ---END---, and click Enter License in the plugin when presented with the Demo dialog. From here, paste your licence into the text entry box (or use the Paste License button to do this Automatically), and click Apply to finish the licensing process.

Khords’ Keyboard and Playback
At any point, you can trigger Khords using the on-screen keyboard at the bottom. More often, you’ll use MIDI in your DAW to trigger Khords – in most cases, the keyboard display within the plugin is used for feedback on what notes are being sent to Khords by your DAW, rather than for actively playing Khords with your mouse pointer.

Note that Khords uses sampled sounds to do its thing. These repitch and retime as you move up and down the keyboard, for a classic sampled feel. For example, a guitar’s strum or a tremolo effect will be faster at higher notes and slower at lower ones. This is an intentional behaviour, although it can be compensated for to an extent by using the Stretch function.
At any time, you can Alt-click a control to reset it back to its default, and Cmd-drag (Mac) or Ctrl-drag (Windows) to change that control on a finer scale.
Loading Presets
Khords installs with 550 presets – each is a fully designed synth patch with samples, effects and processing already set up. Presets are organised into 14 categories, which are accessed through the Preset menu at the top of the instrument.
Click the Preset bar to open the dropdown menu and select from the presets.
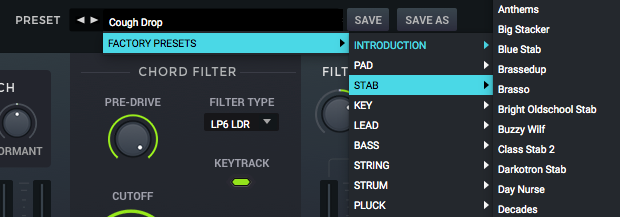
You can use the left/right arrows on the left to navigate to the previous or next patch in the collection. Moving past the first or last preset in a category will take you automatically into the previous or next category.
Chord Layer & Note Layer: The Basics
At the heart of Khords are two ‘oscillators’, which each play back one of 315 samples from the extensive Loopmasters collection.
Choosing Samples
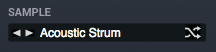
To select a sample, click the name in the Sample selector, and choose a from the list via tonality and instrument categories.

Both the Chord Layer and Note Layer can play any sample, and don’t have to be used strictly for chords and notes respectively.
You can flick between samples instantly using the left and right arrow buttons next to the sample name.
Selecting Samples Randomly
Use the button to the right of the sample name to select a new sample randomly.
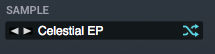
This will select a random sample from the same tonality category. In other words, if the current sample is taken from the Major Feel category, every randomised selection will also be taken from the Major Feel category.
Sample Start Time
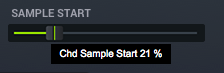
Not every sample will have the attack you want, so you can choose the point at which playback starts using the Sample Start slider.
This won’t delay the sample, but rather will chop off a certain amount from the beginning, creating a new ‘beginning point’ for the sample, from which it will play as soon as you hit a key. You could, for example, take out the first few notes from a harp glissando or remove the initial build from a synth patch.
Chord Layer & Note Layer: Further Functions
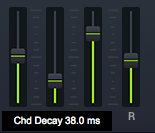
Amplitude Envelope
Each sample layer implements a standard ADSR envelope. Raise A (attack) to change the time it takes for the sample to hit; raise D (decay) to change the time it takes the signal to fall back down to the level you set in S (sustain); raise R (release) to change the time it takes each note to fade out.
Stretch Panel
With the Speed and Formant controls, you can warp a sample layer to your liking. While pitchshifting and tuning is taken care of by the Transpose controls, the Speed dial offers control over the playback speed of a sample, helping you slow down fast strums or speed up tremolo effects, for example.
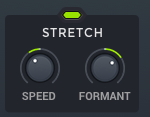
Note: For the Speed or Formant dials to work, the Stretch panel light must be activated.
Formant shifts the ‘frequency signature’ of a sound up or down, changing the timbre in a way that keeps the pitch the same. You could use Formant to change the character of acoustic sounds or to deepen high-register instruments
Transpose Samples
There are three transposition selectors in Khords: one each for each sample layer, and another Master control which affects both. These controls all tune samples in semitones, adding or subtracting up to 24 (two octaves) per layer, and up to 12 (one octave) for the Master.
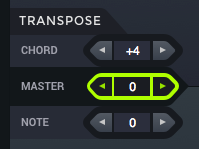
The most common usage of these controls is to tune a single layer to your liking – often a whole octave (+/-12) will create a good effect, and fifths (+/-7) are worth trying too. Using the Master will bring you the same effect as changing the input MIDI notes in your DAW.
Tip: With a single note tuned to 0, transpose a minor chord by +4 to create a major seventh, or transpose a major chord by +3 to create a minor seventh.
Chord Filter / Note Filter
Each layer inside Khords gets its own filter. You can call up a range of 12 filter types, add drive and resonance, and affect the cutoff with keytracking to match your notes.
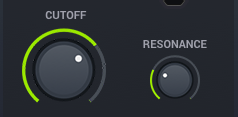
Cutoff and Resonance
Adjust the Cutoff control to remove frequencies from the signal. Add resonance to increase the gain of the frequencies around the Cutoff.
Filter Type
Select from 12 types of filter using this menu. Choosing a Low Pass (LP) leads the filter to reject every part of the signal above the Cutoff frequency; choosing a High Pass (HP) leads the filter to reject every part of the signal below the Cutoff frequency; choosing a Band Pass (BP) rejects both high and low frequencies, leaving the remaining frequencies between, in a region determined by the Cutoff frequency.

Choose between models with 6, 12, 18 or 24 dB/octave slopes after the cutoff – the higher the number, the steeper the rejection of frequencies, but the less natural-sounding the filter. LDR designs recreate the response of an iconic ‘ladder’ filter.
Keytrack
Activating this switch will cause the filter’s cutoff to move higher or lower in response to the notes Khords receives. This movement isn’t reflected on the Cutoff dial visually, but is useful for ensuring that each note is heard equally, and that higher notes aren’t cut out by a Low Pass filter.
Pre-Drive
This control adds distortion to the signal before it hits the filter. High Pre-Drive settings work great on synth sounds, but take care when applying this control to acoustic samples.
Filter Envelope
Similar in appearance to each sample’s ADSR envelope, the Filter Envelope controls the movement of the Filter Cutoff for each note that’s played.
A (attack) sets the time taken after a note is played for the filter cutoff to raise to its maximum, after which the D (decay) slider determines how long it takes the cutoff to fall to the level you set for S (Sustain). R (release) controls the length of time it takes for the filter cutoff to drop again.
The Filter Envelope won’t actually be active until set using the Amount slider above, which can be applied positively (raising the cutoff with each note) or negatively (lowering the cutoff with each note).

Tip: Setting the Filter Cutoff to maximum and increasing the Filter Envelope Amount will mean the envelope’s attack has no effect. Khords increases or decreases the filter cutoff using the current cutoff setting as a starting point.
Filter LFO
These controls select how each layer’s filter cutoff will be affected by that layer’s LFO. The LFO is a cycling signal that will move the cutoff up and down automatically at a speed and depth you set yourself.

Shape
Choose from eight LFO waveform shapes. Sine, Triangle, Square and Saw mimic the classic analogue waveforms; Random generates a randomly stepped modulation waveform, while Drift generates a smooth, randomly moving modulation waveform.
Amount
This sets the depth of the LFO signal’s effect on the filter cutoff. Positive values apply the chosen shape directly to the cutoff, while negative values reverse the polarity so that, for example, the sine shape moves the cutoff down then up, not up then down.
Rate and Sync
The Rate dial sets the speed of the LFO signal’s movement, measured in Hertz by default. If Sync is activated, the modulation speed will snap to exact values based on the host’s tempo, from a slow 8-bar cycle to a fast 1/32T cycle.
T values indicate ‘Triplet’ timing (three for every two in non-triplet timing), while D values indicated ‘Dotted’ timing (the original non-dotted time multiplied by 1.5).
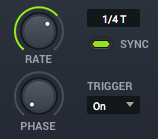
Phase
This offsets the starting time of the LFO signal. While the cycle of a sine wave will, by default, start at 0, move up to +1, back through 0 down to -1 and back to 0 again, Phase will change the starting point of the LFO signal to another point within this cycle.
Phase is measured in degrees, where 360 is ‘full-circle’, back to where the wave cycle started, and 180 starts the signal halfway through.
Trigger
With Trigger set to Off, the LFO will play consistently. With Trigger On, the LFO’s cycle will restart with every incoming note. If your notes or your LFO rate are not playing ‘to the grid’ in your DAW, this can be a useful setting to ensure that each note sounds the same in its LFO modulation.
Level
Determine the output level for each sample layer. These faders can be used either to blend the two layers together and/or to compensate for any changes level due to filtering, envelope sustain, etc.
FX Section
Khords comes with a choice of effects that work great for adding atmosphere to tonal chord lines. Each of the Chorus, Delay and Reverb modules has its own diverse types to select, and the three can be routed in various ways. Each effects module must be activated by switching on the light at the top.
Chorus
This effect duplicates the input signal, and delays one copy by a certain amount. The result is a wider, warbling sound similar to the effect when multiple singing voices (ie, a ‘chorus’) perform together, with slight timing and pitch differences ‘thickening’ the sound.
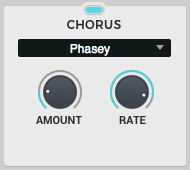
There are six Chorus Algorithms to select: Gentle applies a subtle effect that helps widen and add atmosphere to a signal, Detune is great for unison ‘stack’-style effects, Widen is specially designed to increase the stereo presence of a signal, Uber is a more extreme version of the chorus effect, Warble gives a classic ‘vibe’ effect reminiscent of guitar pedal effects, and Phasey is similar to the sound of a phaser, putting the ‘jet plane whoosh’ effect behind the sound.
For each type of chorus effect, use the Amount dial to apply it more heavily to the signal, and use the Rate knob to control the speed of the effect.
Tip: Experiment using the chorus with low-Rate high-Amount settings versus high-Rate low-Amount settings.
Delay
You can make your signals echo rhythmically with three types of delay algorithm. A delay unit takes the input signal and repeats it at a time you specify.
Switch the Delay unit on with the light at the top, and turn the Amount to half to hear the repeated signal. Turn the Time to low and high values to see the effect it has on the repeat timing. By clicking Sync, you can make the delays’ timing play to your host project’s tempo, making the delay more musical.

By increasing the Delay’s Feedback control, every repeated piece of audio is fed back into the delay processor, giving you repeats of repeats. The time between echoes will be the same, but they’ll take longer to die down with higher Feedback values.
Tip: By cranking Feedback to it maximum, the sound will build and build without dying off. This is best used as a performance effect when the level of the Feedback knob can be brought back down if things get too loud.
There are three types of Delay onboard Khords: Stereo delays both the left and right audio channels separately, in isolation; Cross swaps the left and right channels for the delay output, meaning that audio input on the left will be output on the right, and vice versa; Ping Pong feeds the echoed signal from left to right, vice versa, and back again.
Reverb
This module will add a sense of space to your signal, making it sound as if it’s located in a real-world room or other space. You’ll need to switch it on by activating the light at the top of the module.

Raise the Amount to increase the level of the reverb effect, and change the Size dial to increase the perceived size of the virtual environment.
The Reverb module has six types of spatial profile, each reflecting the frequency areas it emphasises: the two Bright models are great for high frequencies, Dark types have a nice atmospheric effect on lower frequencies, and the Mid reverb types are suited to all-round reverbs.
PreDelay adds a short delay to the start of the reverb. Increasing this control keeps the same profile of ‘virtual sonic space’, but helps the sound appear to come from a different distance away from you within that same space.
FX Routing
The three FX modules are not fixed into the Chorus >> Delay >> Reverb signal path, although this is the default setup. By clicking the Routing Arrows, you can choose between all five other possible combinations of these three processors.
Conventionally, Delay comes before Reverb in a signal path, but with short reverb times especially, a delay effect can benefit from have a short, snappy ‘gated’-sounding reverb ahead of it. Chorus is also often used first in the chain, although a light chorus effect can smooth out a stark, heavy reverb tail.
Master FX
Placed just before Khords’ output, the Master FX section offers final polishing and levelling of the sound produced in the rest of the patch, making the sound ready to go into your project.

Frequency Booster
This section can add more power and weight to your sound, making your chords support themselves better in the mix when competing with other instruments. In effect, the Frequency Booster is a multiband compressor, squeezing those three regions of the signal through processing at different strengths.
Top, Middle and Bottom
These knobs increase the strength of processing to three bands of frequencies: high, mid and low frequencies for the Top, Middle and Bottom dials respectively. These frequencies have been tuned with the sorts of audio material that Khords will generate in mind, and there’s no need to set the band crossovers yourself.
The Frequency Booster can be used to apply both gentle and extreme effects. Listen out to how your signal’s transients are affected by its processing.
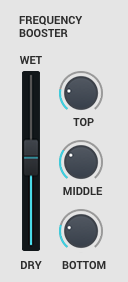
Dry/Wet Slider
This applies the effect dialled in within the Top, Middle and Bottom knobs by a certain amount. At fully Dry, no frequency boosting takes place – raise the slider towards Wet to increase the amount of frequency boosting applied to the signal.
Tip: Set the Frequency Booster to fully Wet, dial in extreme, characterful controls that emphasize your signal intensely, then back off the slider towards the Dry end to ‘blend’ this processing in on a more subtle level.
Level
This is the master level slider, reducing or increasing Khords’ output signal. Use this to compensate for Level changes you’ve made for each layer, as well as for processing you’ve added through the FX modules and the Frequency Booster.
You can see how loud your output signal is by the height it reaches on the illuminated sides of the slider.
Voice Settings, Wheels and Macros
In Khords’ bottom-left panel, you’ll find ways to control how Khords responds to incoming notes and other controls, as well as methods for making it more interactive and easy to perform with.
Voice Settings: Portamento, Glide, Legato
When the selector to the right is set to Legato, Khords will behave as expected for any usual instrument or synthesizer, until you overlap multiple MIDI notes together.
When notes are overlapped in Legato mode, there will be a sweeping pitch transition between the overlapping notes, and the time taken for this is determined by the Glide setting.

With Porta (Portamento) selected, the notes don’t even need to overlap in order for this Glide to happen.
Tip: With Portamento active, use a medium Glide time and raise a filter envelope’s Attack time for even more morphing transition between notes.
Pitch and Range
Using your MIDI controller’s Pitchbend wheel, you can affect the pitch of Khords’ playback on the fly. You can also use the Pitch slider with your mouse or automate it in your DAW, pushing it up or down to bend the pitch to your will at any time the synth is playing.

The Range selector defines how many semitones the maximum and minimum extremes of the Pitch wheel’s movement will bend the tone, from 2 to 12 semitones both ways. At low values, you get finer control of pitch bending, while at high values, you can perform extreme bends.
Mod Controls
Using the Mod section, you can set four parameters to be affected at once from a single control. This is useful for live performance and automation of multiple values across a track or track section.
Tip: The simplest use of the Mod parameter is to control both layers’ filter cutoffs at the same time, in order to use the Mod control as a single filter control.
Your MIDI controller’s Mod Wheel is automatically linked to this parameter on Khords, but you can also click and drag to set it yourself in the plugin’s interface.
In the setup below, the further we raise the Mod parater – whether using our connected MIDI controller or by dragging it with our mouse – the more the selected parameters in the four slots will change.

The bar below each selected parameter determines its value at the Mod wheel’s maximum value (fully up). As the Mod slider is raised, the Chord Layer’s Formant control will be lowered; the Note Layer’s Filter Cutoff will be raised and its LFO Rate raised; and the Reverb Amount will be raised by an even larger amount.
Many presets come with these routings set up, so you can get a great idea of how they work by checking them out in a few contexts.
Outro
Thanks for buying and using Khords – if you haven’t found the answers you were searching for in this user manual, or you’d like to submit a feature request for future version of the plugin, please contact support.
Comments
0 comments
Article is closed for comments.